
Tonemap and Light Mixer
Both are After Effects effects, installed with the Gulp plug-ins. You find them under Effect ▸ Gulp. Both render on the GPU when After Effects uses Mercury GPU Acceleration (CUDA on Windows, Metal on macOS), and on the CPU otherwise — the picture is the same either way.
Gulp Tonemap
Section titled “Gulp Tonemap”A scene-linear render looks flat and blown out until a view transform is applied. Gulp Tonemap applies one: ACES 1.0 and 2.0 (the exact transforms, the same views Cinema 4D and Redshift use) or a choice of tone curves.
Adding it
Section titled “Adding it”- On build. Tick Add Gulp Tonemap in the Build dialog, or turn on Add Gulp Tonemap on build in Preferences ▸ Gulp Tonemap. Gulp puts an adjustment layer called “Gulp Tonemap” at the top of the comp.
- On an existing comp. Open the comp in After Effects’ viewer and press Add Tonemapper in the panel. If the comp already has one, its settings are updated rather than stacked.
- By hand. Apply Effect ▸ Gulp ▸ Gulp Tonemap to an adjustment layer.
Matching the render
Section titled “Matching the render”A Redshift render with both a Main (the colour-processed beauty) and a Beauty AOV carries the look you saw in the render view. Gulp can compare the two and set Gulp Tonemap so the Beauty looks like the Main — including which ACES version was used and whether the camera’s tone mapping was on, which no file records.
- In the Build dialog, tick Match Tonemap as well as Add Gulp Tonemap.
- With Add Tonemapper, choose Match to the Main.
Matching takes a few seconds. When there is no Main and Beauty pair, Add Tonemapper offers Neutral — an exact pass-through, ready to dial in by hand — or, in a project using Adobe colour management, Add the view, which applies your default tone curve.
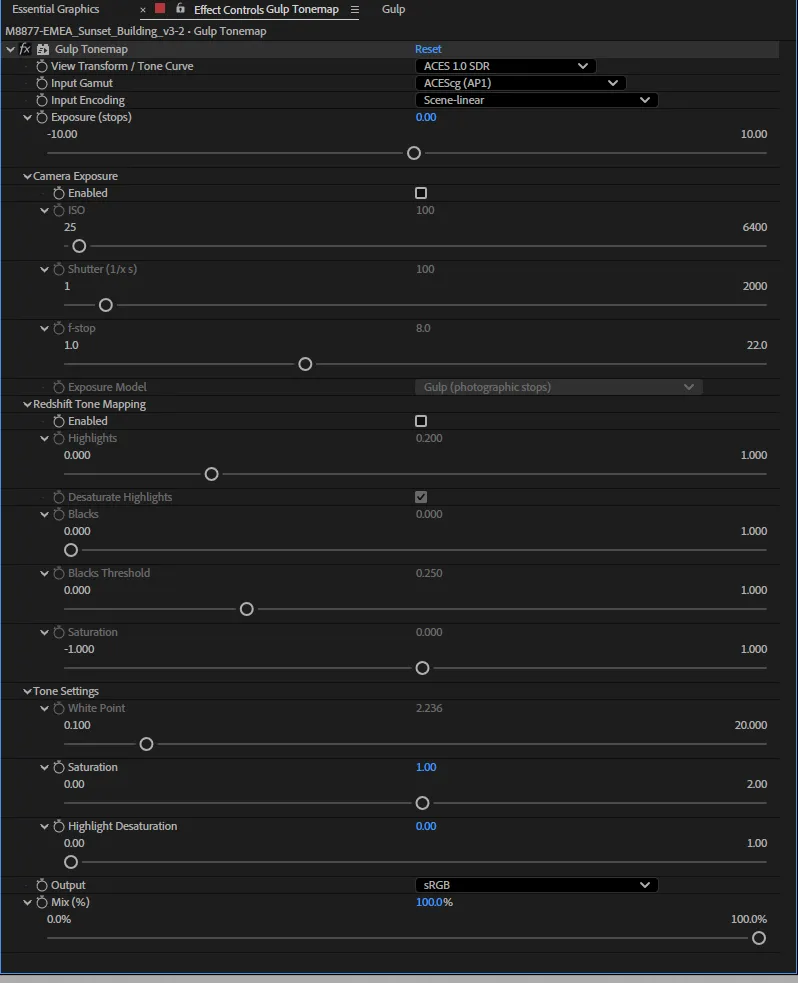
The controls
Section titled “The controls”| Control | What it does |
|---|---|
| View Transform / Tone Curve | None; the ACES views ACES 1.0 SDR and ACES 2.0 SDR; or a tone curve: ACES Filmic (fast), AgX, AgX Punchy, PBR Neutral, Reinhard, Reinhard Extended, Hable. |
| Input Gamut | ACEScg (AP1) or Linear Rec.709 / sRGB — the primaries the render was made in. |
| Input Encoding | Scene-linear, or sRGB / Gamma 2.2 (pure power) to decode a working space that is not linearised. |
| Exposure (stops) | Brightens or darkens before the curve. |
| Output | Linear, sRGB, Rec.709 (gamma 2.4) or Gamma 2.2 (pure power). |
| Mix (%) | Blends the result with the untouched layer. |
Three twirl-down groups hold the rest:
| Group | Controls |
|---|---|
| Camera Exposure | Enabled, ISO, Shutter (1/x s), f-stop, and Exposure Model — Gulp (photographic stops) or Redshift (matches RS camera). |
| Redshift Tone Mapping | Enabled, Highlights, Desaturate Highlights, Blacks, Blacks Threshold, Saturation. Reproduces the Redshift camera’s tone mapping, applied before the view transform as Redshift does. |
| Tone Settings | White Point, Saturation, Highlight Desaturation. |
Reset in Effect Controls leaves the layer untouched — None, linear in and out — so you can switch on one stage at a time from neutral.
Guidance
Section titled “Guidance”Gulp Tonemap tells you when a setting will not do what you expect. It never changes a value behind your back; it only greys out controls and renames labels.
- Controls that do nothing are greyed out: the camera settings until Camera Exposure is enabled, the Redshift sliders until Redshift Tone Mapping is, and White Point unless the curve uses one (Reinhard Extended, Hable).
- (!) Needs a 32 bpc project — the project is 8 or 16 bpc, so values above 1.0 are clipped before the curve sees them. Set 32 bpc in the colour settings.
- Output (!) AE view applies too — the project uses OCIO, so After Effects already applies a view. Leave Gulp Tonemap at None and Linear, or the view is applied twice.
- Output (!) AE encodes too — the working space is linearised, so After Effects encodes the result itself. Set Output to Linear.
- Output (!) needs sRGB here — the working space is not linearised, so the result must be encoded. Set Output to sRGB.
In Premiere Pro
Section titled “In Premiere Pro”Gulp Tonemap comes through to Premiere Pro with a Dynamic Link comp. In an OCIO project, Send Comp to Premiere can add one for you so the comp looks the same in Premiere as in After Effects.
Gulp Light Mixer
Section titled “Gulp Light Mixer”Gulp Light Mixer relights a shot from its light-group AOVs without re-rendering. Each light gets its own row, named after it, with its own intensity and colour. At 100% on every row the output is exactly the beauty.
Light groups are passes named Beauty_<light> — Beauty_Sun, Beauty_Fill and so on. Gulp
treats three or more of them beside a Beauty as a light-group set.
Adding it
Section titled “Adding it”- On build. Tick Light Mixer in the Build dialog. A “Light Mixer” layer takes the beauty’s place, with every light group wired in. With Add Gulp Tonemap ticked too, the Gulp Tonemap layer sits on top, so every relight is tone-mapped the way the render was.
- On an existing comp. Open the comp and press Add Light AOV Mixer in the panel. It needs
three or more
Beauty_<light>layers beside a Beauty. - By hand. Apply Effect ▸ Gulp ▸ Gulp Light Mixer to a layer and choose each row’s Layer. The layer the effect sits on only sets the frame size; its own pixels are not used.
The build log says how much of the beauty the light groups account for, and warns when a lot of light is in no group.
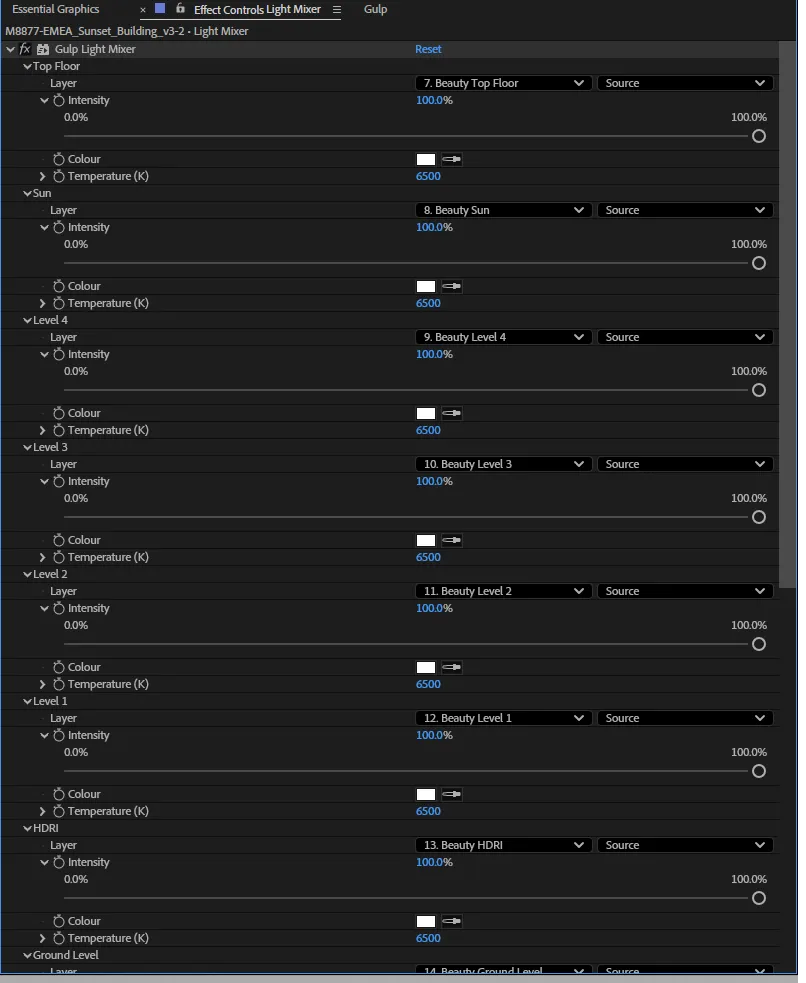
The controls
Section titled “The controls”Each row is its own twirl-down group, named after the light it points at:
| Control | What it does |
|---|---|
| Layer | The light-group layer this row reads. |
| Intensity | 0–100% on the slider; type up to 1000% to push a light. |
| Colour | Tints the light. White changes nothing. |
| Temperature (K) | Warms or cools the light. 6500 K changes nothing. |
The last row, Remainder, carries whatever light no group owns — the beauty with every group taken away — so nothing goes missing when you relight.
Show empty rows shows every row. Off, rows with no layer are hidden except one spare.
The mixer takes up to 16 light groups. With more than that, Build makes a simpler slider rig instead and says why in the log.